Thursday, July 16, 2020

Hardwood clamp, Dubuque Variable-angle Wooden Clamp

I noticed these clamps mentioned by Bob Rozaieski on his Fine Woodworking internet site when we were in Spain this year. I researched the design and started to try and find sources for the hardware, mainly rods that had right hand and left hand threads on the end of each rod. As you can see below, the jaws can be angled for clamping and are also useful for holding work pieces above the normal bench vice, e.g. when making dovetails. The clamp can be operated by holding one handle and turning the whole clamp to speed opening and closure.
Variable-angle wooden clamp. This is the one that I made and gives an idea of the components and operation.
I eventually found a source for the threaded rods at "fine-tools.com" (shipped from Germany) as they sell the clamps and also supply kits that can include the rods, four swivel nuts, ferrules, two rolled spring pins and instructions. These kits are made by "Micro-Moose" of Dubuque, Iowa in USA. They also have the handles available but I decided to make my own, in fact this was the first thing I did. Both were from odd left-overs from green woodworking projects, one of Ash and the other Silver Birch and even though they were dry, it was easy to use the pole lathe to turn suitable handles that fitted well into my hand. One end was turned so that the ferrule fitted snugly but as far as I can see the size and design is up to you.

I made the clamps with some solid Beech (obviously a hardwood is necessary) about two and half inches square. I made the largest one available for the ironware kits from "fine-tools", i.e. 14 inches arm length and 10 1/4 inch jaw opening. Other options are 4, 5, 6, 8, 10, 12 as well as 14 inches. I am not going to go through the details of the dimensions etc but feel free to contact me if you need that kind of information. I will just go through some of the construction not covered in detail in the instructions.

The stock was easily prepared to the dimensions using a Fore plane and Jointer plane to get flat surfaces. The holes for the barrel (or swivel) nuts were made with a 5/8 inch brace and bit, drilling from each end to meet in the centre to get a good alignment. The angled mortices were made by the traditional way with a chisel and mallet but using an angle square to judge the correct  orientation, e.g 

After drilling the holes for the barrel nuts, the angled mortices were chiselled using the angle-square set at 14 degrees. These mortices allow the threaded rods to swivel and so aid clamping non-parallel surfaces.
I found it important to get the correct steep angle so that the rods did not jam in the mortice. I checked the barrel nut and rod at each stage and made adjustments when  needed. It is also important to accurately match the position of the last barrel so that they are in-line and correct for the noses of the jaws to meet.

Marking the positions of the holes for the barrel nuts. The pencil lines indicate the angles of the long and short mortices.

The assemble of the clamp was straight forward noting that the threaded bars are of different length with the longer bar at the front and also that the wooden handles fit on the side with the longer threaded section. I found the best way of checking the set-up was to wind the jaws fully open to get the opening to about 10 1/4 inches (mine managed 10 1/2 inches) and then mark the position of the handle so that the threads couldn't be unwound completely. This gave a thread depth into the handle of 1 1/8 to 1 1/4 inches. I also checked that the clamp could be fully closed, i.e. the thread reversal on the bar was at the centre between the jaws.

The last stage was to attach the handles by drilling a central hole with a 7/16 inch drill and as a tight fit, screwing the rod into the handle with the ferrule attached. I did this with the jaws fully open to ensure the handles were fitted to the correct depth. A pin was fitted by a 4 mm hole passing through the ferrule and threaded rod. Finally the wood was treated a couple of times with boiled linseed oil.

To operate the clamp quickly you can hold one handle and rotate  the other handle to get an opening close to what you want and then make a final turns on the appropriate sides to tighten the grip.

I have another one to make in the future so may add some additional tips later.....and here it is. Straight forward and nothing really to add to the description. I did use a hand drill to make holes to start the larger mortices and found this helped the process.

My second clamp with ash handles turned from green wood. The arms are made from beech and treated with linseed oil. It is nice to be able to turn handles to a shape that fits your own hands!!


Tuesday, June 16, 2020

Kuksa inspired by our travels in Sweden


Following a trip to Sweden I was keen to make a Kuksa  in the style that we'd seen in Sweden when visiting the museums. In the summer of 2019 I joined a small group at the Old Craft Centre at Schumacher College making a Kuksa of our own design guided by Felix Cary. This was over a weekend starting from a large log of Downy Birch felled from nearby Dartmoor about a year ago, and more recently (about a month) sawn into large sections ready for further axework. The wood was slightly spalted (starting to decay through fungal attack) and had a few boring insects that had chewed through the bark. This adds to the character of the final bowl but also made the heartwood harder to chisel and shape compared with fresh greenwood. It also had a few knots to be aware of and to avoid in crucial places.
I started with a lump of wood chopped from a log that was big enough to carve the Kuksa.
This is the starting cuboid of Birch showing knotes and grain direction.


This is the other side showing some streaking and grain structure and was to become the top of the Kuksa.
The first step was to axe the sides to make a fairly regular cuboid that could be easily clamped for making the bowl of the Kuksa. After this it was a case of making the outline of the top taking in to account the position of knots and insect holes. I used a plant pot base to get the size I wanted.
A rough outline of the plan of the Kuksa with a centre line marked through the bowl to the handle. The orientation of the handle was determined by a large knot visible underneath the wood.
The slab of wood was then clamped flat and the bowl of the Kuksa chipped out using a small carving Adze. I had never used one of these but soon got the hang of it.
Shows the beginning of the bowl cut with the Adze. After this I used a gouge  to deepen the bowl and smooth the sides better.
The next stage was to axe the sides of the bowl and handle.
To shape the handle I sawed lines across the bottom of the handle so that my axe work didn't split the bowl.
Looking a little more like a Kuksa but still a long way to go. This was basically the stage after the first days work!
I continued with axe work for a couple of hours after this to get as much wood off as possible to take it to about 1 cm from the final size. In fact, in retrospect, I could have continued longer using the axe to avoid a lot of knife work later on in the shaping. This of course depends on having a good sharp axe. I used a dropped forged axe for most of the finer work.
Here you can see the Kuksa taking shape and the Mora knife used to do the finer carving. Still a way to go.
I spent a lot of time trying to shape the rim and also the handle of the Kuksa.
I am happy with the bowl of the Kuksa at the end of the second day but still feel the need to tweek the outside of the bowl and handle to get the shape I want.

Profile of the Kuksa. I was trying to get the handle coming down with the bowl slightly lower. This has worked to a degree.
After I have refined to outer edges and maybe drilled a hole for the leather hanger, I'll treat it with Walnut oil and the outside will get a 1:4 Beeswax:Walnut oil seal. It should take about a week to dry before treatment. I'm still not sure if I'll sand it when dry to get a very smooth finish or leave it with the knife marks. 

Wednesday, January 22, 2020

Rustic mirror frame made from Hazel

My daughter has a rectangular mirror (60 cm x 45 cm) that she wants to mount on a wall. We have two pieces of felled hazel about 8 cm in diameter that looked suitable for the task. Bex in in charge of the design and I'm helping  on the construction.
Our first job was to split the wood down the middle, but because of knots and the grain I decided it was best sawn with a rip saw. So we chose the best alignment to show of the features of the wood and did a straight rip down the centre line of each piece.
Starting point after ripping the Hazel logs.
After this the wood was left for over a year, mostly because Covid-19 made it difficult to work with Bex and also I was abroad for 5 months. Anyway, coming into Autumn 2022 and a few rainy days, we've decided to continue with the project. As expected the wood is now pretty dry having been left in the workshop in dry storage and also the half-cuts (shown above) have warped through drying, some of them more than others. This is probably made worse because of the inherent twisting in the original trunk of the tree. 
We started by looking at the two sides that we originally selected and decided that they were too bulky as they stand and also that we needed a straight edge on the inside to make a rebate to house the mirror. So work was started on preparing these two sides. The first job was to prepare a flat face on the original saw cut. For this I used a Veritas Scrub plane cutting across the grain and checking levels using a 1 m steel rule and  winding sticks for twist. Once this was done the face was smoothed with a smoothing plane and block plane. The intended inside edge was marked straight and planed to size making it square to the already prepared face. The next step was to reduce the thickness of the sides to about 2.5 cm. I did this using a home made kerfing saw (already discussed on this BLOG) to mark as best I could around the side as an aid to rip sawing the sides to size. This was impossible in some places where the curvature of the face was too steep but generally it was possible at the extreme ends of the sides and elsewhere did make a mark on the wood for guidance. I used the Roubo frame saw (details on this BLOG) to rip the sides to produce a planks with one planed face, a sawn face with one straight edge and a natural wavy edge (which will form the outside edge of the mirror).
This shows one of the sides below the saw already sawn to size and the other side being sawn with the Roubo type frame saw. The thickness of both pieces was 2.5 cm.

The sawn face was then planed to remove the saw marks and finally a No 80 cabinet scraper was used to smooth some tear-out which was difficult to remove with a well sharpened plane!

This shows two of the sides sawn and planed. These are 72 cm in length and may become the two rails. The shapes on these mirror each other as they were sawn from the same branch. The bark on the edges will not be removed for the moment.

Originally I was thinking of joining the frame with mortice and tenons joints but have decided to use lap joints that allow both rails and sides to overlap to give a more rustic look.  Because the bark is left on the outside of the sides, the overlap had to be carefully marked on the "bark side" and meant that a full overlap joint was difficult because of the oval shape of the bark. As a compromise, the joint was made to half of the depth of the side thickness to enable a close fit joint but keep the bark intact. In addition the joint will be strengthened using oak dowels through each of the lap-joints. 

Cutting the lap joins using a chisel and finishing with a Stanley no 71 router.

After the lap joints had been cut and adjusted to good fits using a fine wood file and carving knife, the rebates for the mirror housing were cut on the bottom and top rails. These were marked 1 cm longer than the rails on each side and 2 cm wide. The kerfing plane was used to saw and mark the width of the rebate. The rebate plane was tried but it was found to be difficult because of the end stops on the rebate, Instead a plough plane was used and the ends chiselled as needed,

The frame was then glued using G-clamps on each of the joints and kept flat using the wooden clamps as shown:
The frame glued before dowelling the joints.

The next step was to make rails to hold the mirror into the rebates along the top and bottom ends. I used some left over pieces of ash for this to fit across the rebates and also into them to make a snug fit, This proved quite difficult because the ash was very hard and difficult to rebate. I also made some rails to fit on the rear and glued on each side of the mirror. The final stage was to make a hanger that will be screwed to the rear of the mirror frame to aid fitting it to a wall. This was made from some of the left-over pieces of hazel.

The frame after a final sanding to remove pencil marks and after the first coat of Danish oil. The Danish oil darkens the wood considerable and shows the oak dowels to good effect. The two slats in the centre are to hold the mirror in the rebate at the rear.

The frame was then treated with Danish oil on both sides and also on the bark. Checking experiences on the internet with treating bark, Danish oil seems to be a popular method. Also the bark may last longer on the wood because it was felled in the winter when the sap wasn't rising. Also I have the feeling (based on no evidence apart from it's use in fencing etc!!) that hazel keeps it's bark intact better than many woods, but we'll see about that. So far with the varies planing and sawing, it has remained firmly attached to the wood. Hazel has quite a thick cambian layer under the bark which might help ? I will give the frame three coats of Danish oil over several days leaving at least 24 hours between coats.
Finished mirror after three treatments with Danish oil.

Rear view of the mirror with the rebate rails installed and the hanging mounts at the top. Couldn't resist writing the year and wood (hazel) on the mount!!


Tuesday, January 14, 2020

Spoon/knife carving, 2020

We are abroad for a while and I normally take some blanks for carving, usually on the beach in the sunshine or on our terrace. Here are some I'm taking this year:
A couple of beech blanks for making spoons for the coffee jar. I have made coffee spoons before but these have long handles. The new design is similar but the handles are going to be much shorted, "thumb print" size. 
This is my first attempt at making a folding spoon after the design of Jane Mickelborough. The mortice and tenon have been cut but not shaped yet. The pencil lines show the final shape being aimed for.
Beech ladle or scoop, not sure yet!! (side view)

Plan view of scoop/ladle.

These blanks were cut from a beech branch that had been split down the middle. The branch was from an ash tree felled at Dartington and may have been cut by mistake in the autumn. All the branch sections were curved so this was used for full advantage in designing the folding spoon and scoop. I also had some blanks for knives that are not shown above.

For the folding spoon, care was taken to keep the longitudinal grain at the hinge pin (where the halves of the spoon meet or fold). The wood was green and carved very well with a close grain. They were stored in a closed paper bag until being carved further.

I've just completed the first of the coffee spoons (blank is shown at the top). The handle is short so that the spoon can fit into the coffee jar. The beech wood was quite hard, probably it had dried more than I'd expected since collecting.
Coffee spoon carved from Dartington beech. This is smaller than I've made before so as to fit into the coffee jar. 

This side profile shows the angle of the handle that the thumb-hold made to the bowl. Beech is a close grain wood that is forgiving when carving but harder than birch.
I'll finish the sanding, drying and treatment with Walnut oil later.

The next item to finish was easier and similar to a butter knife I'd previously carved from Silver Birch. This time I'd used a splint of Ash that was roughly shaped with an axe and draw-knife so that the final shaping was relatively easy. I may use this as a camping knife on treks; yes it is lighter than titanium!

Butter knife made from Ash wood and similar to a design I'd found successful before for spreading butter etc and even when turning small pancakes on the gridle. 
Beech traveller's spoon

End profile of the above Beech spoon.
I carved this simple knife today whilst on the beach at Guardamar from a shard of Ash (Dartington) basically taking the design from some I'd seen in Sweden when touring. The wood was already dry.  I got a really smooth finish with sanding 80 grit to 320. I'll treat with Walnut oil later.

Ash knife that shows some interesting shades along the grain of the wood.
This is another knife made with Ash but this time with some teeth to aid cutting.
Ash knife that does the job on this "delicioso queso"
Now started to make a fork with more Ash. Firstly I marked a rough design and cut the tines after drilling the holes at the base of each piece to be cut out.
Limited tools here so cutting with a small axe-saw blade took a long time.
The carving was fairly straight forward and I tried to give some curvature to the fork but this was limited by the grain and thickness of the wood. I also had a small knot in the Ash that was revealed as I carved the handle so I had to make the handle slightly thicker than I'd wanted. I think the knot and colour was a result of dieback in the branch. This is my first fork and I am reasonable happy with the attempt. The test will come in using it!
Fork carved from a slice of Ash wood. This has had one treatment with walnut oil and after sanding (350 grit) I'll give it a second coat.
Spatula for camp cooking, also made from Ash.
Also tried some Ash spatulas that I thought might come in handy for camp cooking. Here is another that also has a knife edge.
Ash spatula with knife edge 
Next a second coffee spoon with a short handle, again made from beech that had more or less dried and so was hard carving which meant my knives had to be continually sharp. I have a couple of small diamond sharpeners that I bought along that are proving useful!!
Second coffee spoon (for the coffee jar) made from beech and yet to be treated to bring out the wood grain. The "thumb indent" was smaller than that on the previous spoon.

Side profile of the spoon above showing the downward curvature of the handle. The basic idea is for the spoon to fit inside a coffee jar and so remain with the jar for convenience.

Now making progress with the folding spoon. I roughly carved the handle and the spoon separately but have not made the hinge yet. I am concerned that drilling the hole for the pin hinge at this stage may be a mistake and prefer to get the spoon carved to something like it's final shape. The angle of the spoon to the handle is slightly less than the template that I am following and this will affect the hinge position. I noticed the hinge position described in the book is crucial to the spoon closing completely (Jane Mickelborough, " Make a Folding Spoon" Crafty Little Press, 2018).

The spoon is not joined yet and looks like this:
Top of spoon ready to carve,  fit the hinge and do the final spoon carving

Side view. Pencil lines are taken from the template but the hinge pin position has not been marked yet. The spoon bowl follows the direction of the beech grain

Bottom of the spoon. The symmetry looks good but there is still some adjustment to the tenon and mortice to get a closer fit before marking the hinge pin.
I managed to get a small hand-drill at the local second-hand market on Sunday so this evening I took the leap and drilled a hole for the hinge using the method described Jane Mickelboroughby. I did this in stages by marking the arcs as described by Jane and drilling the hole from both sides using a home made vice that I use for spoon carving from time to time. I think it is OK but at this stage the spoon doesn't close completely so I have a little refining to do (see some of my pencil lines in the photo below). The pin is a tight fit as I drilled the hole a slightly smaller diameter of the pin and this works fine once the pin is in place. When it folds, the mid-point of the handle lines up with the centre of the spoon as planned.
The folding spoon with the hinge pin in place. There is still a lot of refining to do, especially to allow the spoon to fold completely and get matching surfaces in the hinge area.

Today I finished the spoon by firstly removing wood to allow the spoon to fold completely. This was done carefully, more or less on the lines I had marked in the above photo. This was straight forward so I continued refining the surfaces before sanding. 
The finished spoon, the pin has to be fixed in place and wood treated.

The spoon when folded ready for travelling.

Side profile (handle not fully open here)
I am happy how it turned out as my first attempt, and it will be used because it's handy to pack and light weight for camping. It was challenging to carve even with the guide book. The main problem was getting the hinge in the right place so that the spoon closes and so is not under stress whilst folded, and having sufficient angle on the spoon to get the geometry right. It is important that the handle, hinge and spoon follow the grain of the wood so that is sufficiently strong, particularly at the hinge. I'll update later when I have had a chance to put it into use whilst camping.

I have now started the ladle, again of beech and with the shape determined by the grain of the wood. I have so far left the handle, just marking a centre line and a general shape. I thought it best to work on the bowl part whilst the handle is still quite chunky. So far most of the carving as been with a curved (or bent) gouge as a lot of material needed to be removed. I then used the curved knife to smooth the surface out. If I'd had my draw knife here, it would have been much easier to remove wood from the outside to get something closer to the shape I wanted to finish with, otherwise quite  hard work on the hard beech (now pretty dry) with the carving knife.
 Still a lot of carving on the bowl sides and base. As yet I haven't shaped the handle; hopefully it will be thinner and more curved as the shaping progresses.
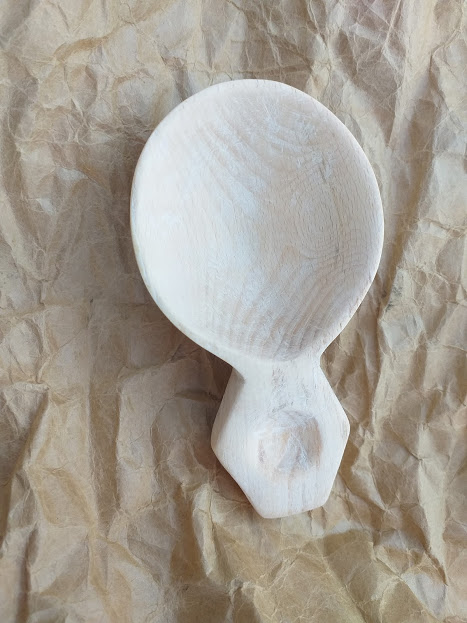
The final shaping took some time as I tried to narrow the bowl sides and base and shape the handle. The knot shown in the photo above was difficult to avoid so I will probably fill in a small indent later.
The ladle is finished apart from treatment and attention to the knot.

Side profile of the bowl and shaped handle. The wood grain follows the shape of the handle and bowl.

Wednesday, November 20, 2019

Small stool in style of Japanese bath stool

In between other jobs I had some spare wood left to make a small stool for my grandchildren. I wanted to try another design so went for a stool with "through angled tenons". These joints I found quite challenging to do with hand tools but I persevered and so I include a few thoughts from this project here.
I made the top and legs from a 3.5 cm thick pine board. The finished stool was 36 cm long and 22 cm wide and the height was 24 cm. Pine isn't ideal for detailed joints because of the course grain and so takes more care to work and sharp tools. I used a section of 2 x 2 inches to make the stretcher connecting the two legs.
Stool after making the joints. Surface preparation (planing and sanding), preparing clefts, gluing and treatment yet to do.
The legs were set at an angle of 10 degrees from upright hence fixing the angle of the mortice and tenon joints on the two legs and stretcher. I set the angle on an angled bevel marker and this remained fixed for the entire job. the construction involved:
1. Marking out the two legs and sawing to shape. This can be just rectangular or truncated pyramid as shown. I also made a 5 cm cylindrical cut in the middle of the bottom of each leg and so made four balancing points for better stability of the stool. 
2. I decided to make two mortice and tenons on each leg to join them to the top of the stool. Basically the top was 12.5 cm wide and each tenon was 2.5 cm wide. The length of the tenon was about 5 cm to allow them to protrude out of the top so that the beech wedge could be added when gluing and then sawn/planed to the meet the top surface.
3. The most difficult part of the construction for me was cutting the mortices in the stool top. For this I made a small jig to clamp to the top and use as a chisel guide to get the correct angled mortice  (again 10 degrees).  I found that if I clamped the jig firmly to the top with a piece of plywood on the underside of the top, I could cut the mortice from one side right through to the plywood base. This worked well for all the joints. I made the jig by sawing/planing the correct angle on the face of a piece of beech and then cutting into three sections and then gluing together with the centre piece off- set.
Beech jig for cutting mortices. The face is angled at 10 degrees to the vertical and the width matches the tenons. The front "prongs" are also angled.
Finished stool after two coatings of Danish Oil. A further coating of clear polyurethane was applied after a couple of days. Now in full use by grandchildren.