Wednesday, January 13, 2021

Small soap bowl turned from ash

 I have turned a couple of soap bowls using ash greenwood and also carved some rectangular ones. I thought I'd just remind myself of the process as we needed a couple more bowls.

I started with a log of spalted ash and sawed, chopped and chiselled a blank as usual. The wood was hard and not the easiest to turn but it all adds to the experience. I adjusted the arm rest on the lathe to get the tool in a good position and also released some tension on the bungy cord (it was taut because the previous job had been a large hefty bowl which needed a bit of muscle to turn). I attached a tenon mandrel and started turning the outside of the bowl and base including a plinth and concave shape as shown below.

Roughing out the outside with TU tool. The ash is spalted but hard.

I did the outside with a slight bulge around the centre.

Turning the centre was challenging because of the lack of space between the core and the inside. The photo shows the use of the cranked tool (double sided UP tool).
 
The inside of the bowl was  turned with the TD tool near the centre and then the TU to shape the rim and inside. I had the usual problem with the core but the cranked tool (as shown above) helped excavate the bowl. This was difficult because of the space between the core and inside of the bowl. I think I will make a smaller diameter mandrel for the small bowls as this will make the excavation easier.

When the inside was deep enough I decided to chisel the core out and release the mandrel. I guess this would be frowned on by traditionalists but to me it made sense not to risk damaging the bowl at this stage. This proved to be easy taking care to work across the grain when close to the base.

The soap bowl after finishing ( 8 cm diameter and 5 cm depth.)

After this I turned another soap bowl with another section of the spalted ash log but made this a wider diameter and shallow. I used the same tenon mandrel. This turned easier than the small deeper bowl shown above because access to the inside of the bowl was easier although removing the core was still very difficult and I need more practice with reducing the core to a small enough diameter to allow an easy break across the grain.

Larger diameter ash soap bowl (about 13 cm diameter and 3.5 cm depth)


Friday, January 8, 2021

Bowl turning on Pole Lathe- large ash bowl.

 I decided to try making another bowl on the pole lathe using a large ash log that had been felled last summer and left in the woods until removing in December (2020) and stored in my workshop until now. This is the largest bowl that I have tried (about 8 inches diameter) and I know that ash is not the easiest wood to use for bowls because of the "stringy" nature of the grain but I felt like a challenge especially as the wood had spalted and should produce some interesting effects that are totally unpredictable.

The start of the turning process on the outside.

The top of the bowl blank before turning.

The log was split in half and shaped for the lathe. This was difficult because the wood was hard and the final shape wasn't as good as I'd have liked. However, I made some final adjustments after starting the turning. A large mandrel was used and nailed into the blank. 

 I started by shaping roughly the outside with the TU tool and then the base with the TD and TU tools to produce a rim and a slight concave to the centre. The weight and size of the blank made the turning hard work but I knew this would get easier as the wood was removed !

After roughing the outside, the inside was started...a long way to go at this stage.

After some more turning the base is in sight. The rim and outside still need a lot of refinement.

As you can see, I kept the core diameter slightly larger than the mandrel so that I didn't risk breaking. From making other bowls I have always found it difficult to reduce the core diameter. I used the TD tool as much as possible to remove wood near the base of the core and in addition I now have a double edged cranked tool made by Ben Orford that makes excavation near the core easier but I found needs skill to use it - still working on that!

The  "cranked" tool on the right used to reduce the core

One change I did make was to lower the support arm on the lathe as I needed to work more at 6 to 7 OC and this was difficult with the arm high. I have made it more adjustable so that its vertical position can be changed according to the size of the bowl being turned. Ben Orford's videos on bowl turning were useful in judging the relative position of the bowl and arm.

I always find it difficult to judge the depth of bowls but this time I used a large caliper to get the sides about right; the bottom was more difficult but I tried for about 3/8 inch. I used the TD and TU tool to remove some of the core well below the nails of the mandrel. Use of the TD tool became impossible without scraping the rim of the bowl so I tried the cranked tool and it did do the job eventually but I need a lot more practice. The trick is to get the right angle but I kept snagging and when it did work, the sound wasn't pleasant. I sanded the rim and outside and burnished with shavings. Anyway when I got the core down to 1 inch diameter I used a chisel to reduce it a little further (scared of breaking the base) and then broke off the core across the grain.

The broken core still attached to the mandrel

The inside of the bowl after chiselling the remains of the core away. Some spalting and pink colouration evident on the wood.

The outside of the finished bowl. 

The base of the bowl showing the rim and concave base.

The bowl was dried slowly in a paper bag with shavings and then left in a cold workshop after coating with walnut oil.

A smaller bowl was also made from the same log of ash. This went straight forward and produced something that resembled a cereal bowl.
Another ash bowl ready for drying.

The last piece of the ash log was used to make a top for a steel jar and a small bowl. As always I had difficulty reducing  the centre core before breaking it off.


Reducing the centre core before breaking off. The ash was pretty dry having been in the workshop for about 18 months.

Small cereal bowl or similar. Not much sign of spalting on this section of the ash log. 

Side view of the same bowl  before treating with walnut oil.


Tuesday, December 22, 2020

Marking gauge with knife-edge.

 I don't have a knife-edge marking gauge only the pin type so I decided to try and make one following the method shown by Bob Rozaieski (https://brfinewoodworking.com).   It will be easiest if I show the finished gauge first and then go on to describe the construction.

The finished gauge showing the fence, arm and knife-edge.

I used kiln dried beech for the fence and arm and then some hardwood that I obtained from a pallet originating in India so I'm not sure what it is but I liked the colour and hardness. First I used some stock (3 inches by 2 inches and 1 inch thick) and measured out for three fences to make three gauges.

Stock for the three fences

I   drilled the 5/8 inch diameter holes for the arms centred 1 inch from the edge. I drilled these from both sides and then drew tangents to chisel a square base as shown. The top of the fence was shaped by scribing a 1 inch semi-circle centred 1 inch from the top and then using a coping saw to remove the waste and then shape with a carving file.

First stage on one of the fences. The fences were kept together until the main part of the woodwork was completed just because it was easier to handle them in the vice.

All the arm holes drilled and shaped ready to make mortices for the pegs

The next stage was to make the mortices for the holding peg. This was 1/4 inch wide and narrowed from 1/2 inch to 3/8 inch (slope of about 6 degrees).The mortice needed to enter 1/16 th inch into the arm hole on the straight edge of the hole so as to get a tight grip between the fence and the arm.. I did this by first filling the arm hole with a section of beech to prevent tear-out when using the chisel and then drilling a 1/4 inch hole close to the bottom of the  mortice (i.e. just above the straight edge). I then carefully chiselled out the mortice with a mortice chisel concentrating on the vertical side of the mortice and taking to about 3/8 inch wide. I then made the slope on the mortice working from the other side (1/2 inch width side). After removing the plug I made final adjustments to the mortice.  

It is difficult to describe making the tightening peg. I used some waste Indian wood, darker than beech and just as hard and planed a 11 cm piece to get the correct thickness (1/4 inch) and maximum width (1./2 inch). These were made to fit rather than to exact measurements. The slope was then cut with a carving knife / wood file and the ends shaped as shown below.

Tightening peg about 11 cm long and shaped to fit the mortice in the arm.

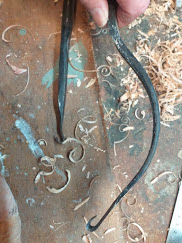
The fence, tightening pegs and knife edge. The knife edge was 1/4 inch wide and about 4 cm long and the holding peg about 4 cm long and 1/4 inch wide (sorry for the mixed units!1)

The fence was finished by putting a 1 cm x 1 cm  chamfer on the lower edge of the fence (on the side away from the cutter), and small (1 mm) chamfers on the edges of the fence. 

The arm was about 9 1/2 inches long (Bob makes his 8 inches I think) and 5/8 inches square and was planed  with the reference side (the flat side) at the bottom. The arm was planed and checked against the size of the hole. The curved side of the arm was shaped with a shoulder plane. This was done by marking the end-grains through the hole in the fence and then planing to the line being careful to check the fit and adjust by finally sanding to get a snug with no slack. This proved easier than I thought. I don't have a 5/8 th hollow plane to make it easier.

The cutting blade was made from a 1/4 inch strip of 001 steel about 4 cm long and shaped to a semi-circle cutting edge. This was held in place with another peg in a 1/4 inch sloped mortice made about 1 inch from the end of the arm. This was shaped as shown. 

The other two gauges were made in the same way but not separated until the mortices were finished.

Difficulties:  The construction is straight forward. Reference faces need to be good on the arm and fence so that all faces are at right angles and flat. The tightening pegs need to be made after the mortices and carved to fit. The mortice on the arm is tricky to make in particular to avoid tear-out when cutting the straight edge nearest the fence.

Three finished marking gauges for presents.


Friday, December 18, 2020

Large bulky mallet

 This was made from some spalted hawthorn wood for the head and ash for the handle. The head was turned on the pole lathe to get the shape I wanted that seemed to fit the wood. The wood was very hard and also pretty wet as it had been sitting outside since the summer but it did turn well.

Finished mallet after treating with linseed oil.

The ash was from the same tree that I made the picture frames from but this particular log was straight grained and ideal for this handle. I enjoyed turning this and finding different grip positions on the handle as I knew the mallet head was going to be big and heavy.

The end of the handle was turned to a diameter of 1 inch so that it could be fitted through the centre of the head. Drilling the hole for the handle in the head was tricky but proved straight forward by using the pole lathe centres to draw a line around the head and then drilling about half way from both sides. I had previously used the pole lathe and pencil to mark a centre line around the head. If you are practised with a traditional brace it is easy to get the holes to meet precisely. 

The handle was attached by glueing and placing a beech wedge across the grain of the handle and the head to reduce the chances of the wedge causing splitting.

Ash picture frames from a log

This is the starting material, a spalted log of partly air dried ash wood.

The log was split in half and then sections of the desired thickness cleaved off.

 Notice in the photo that this log had a well defined curved grain that would be followed when making the frame. The next step was to cleave one of the slices into about 3 cm widths so that each "slice" gave four pieces needed for the frame. I then selected the pieces for the uprights and top/bottom rails. and cut them to the approximate length and selected what would be the reference faces. These were prepared with a roughing or scrub plane first (using a straight edge to decide where to remove wood) and then a joining plane to get a flat surface. The second reference (the narrower of the two) was then planed with a spokeshave at right angles to the first. After this the dimensions were decided and marked from the reference faces with a gauge and then planed to size, finishing with the joining plane on the flat surface and spokeshave on the curved.

The frame was drawn on a piece of A4 paper so that the picture sat squarely and had a border of about 8 mm (for my pictures this was 210 by 140 mm). The pieces of the frame were then aligned with the drawing, made symmetrical as needed, and then the first cross-lap joint on the top was marked with a fine pencil. This was cut with a fine toothed tenon saw keeping to the waste side of the line and the wood removed by a chiselling and finishing with a miniature router (Veritas). The joint was then finely adjusted by chisel to get a tight fit.  When all four joints had been cut, they were fitted and the second half of the joint marked with a marking knife and then chiselled to get a close fit. The frames were sanded and treated twice with Danish oil to finish them.

Finished frames ready for hanging


Friday, November 6, 2020

Making a Bathroom Cabinet using Ash

 This is not green woodworking but I've included it anyway. Basically I wanted to try making something with kiln dried ash to replace a bathroom cabinet that had to fit a particular space in the shower room. This was about 60 cm tall, 35 cm wide and 20 cm deep with two shelves spaced for convenience. I decided to go with a standard box construction with the sides dovetailed to the top and bottom and a panelled door. The top dovetails were hidden (the first time I've done this since a built a bookcase at the Newark Technical college back in the 60's and in my Mum and Dad's front room for many years).

First I had to join the 10 cm ash panels (thickness 12 mm) for the sides, top and bottom. I checked the edges to be joined and then used a jointer plane to adjust before glueing with polyurethane glue. From past experience this glue makes a strong joint but it does entail some careful cleaning-up after it dries. For other joints I used standard interior wood glue. I then used a shooting board to square-up the end of the side panels and marked the dovetails. I allowed overlap when needed so that I could plane and adjust after glueing. The hidden dovetails were straight forward, The only thing I can say about dovetailing with ash is that it is more difficult than beech because, although ash is strong across the grain, it does splinter easily down the grain. The bottom dovetails were lap dovetails so they could not be seen from the side of the cabinet only from underneath. The back was also rebated to 12 mm to allow ash panels to be fitted later. Also before glueing, the housing joints (dados) were cut with a Dado plane to house the two shelves inside the cabinet. This is the first time I've used this plane (1/2 ") with a blade set at an angle and it worked perfectly. The method I'd used before was to chisel out the housing joint and use a router to get an even depth. After this I glued the box together and clamped to ensure that the sides were parallel and set at 90 degrees to the top and bottom. The back panels were rebated to allow movement and cut to size before pinning into the rebates.

I made the panelled door with two pieces of the 10 cm length ash for uprights (styles) and 8 cm pieces for the rails and centre panel of 10 mm thickness that was set in a groove (tongue and grooved). The frame was joined using mortice and tenon joints ( 4 mm tenons). The grooves were cut with a plough plane and mini plough plane (about 3 /16 inch) as they were stopped joints. Finally the panel was rebated to the size of the groove and also to allow it to insert a little in the frame with the back flat with the frame pieces. After glueing the styles were sawed to size but allowing some final adjustments with the plane after fitting the door to the cabinet. 

Finished cabinet before finishing with Danish Oil.

Details of the inside of the cabinet showing the shelves and brass piano hinge.

The door was fixed to the front using a 25.4 brass piano hinge and number 4 brass screws. Pilot holes were drilled carefully with a egg-beater drill to the required depth. I had to remove about 2 mm depth of wood from the side panel to accommodate the hinge. In retrospect this would have been easier to do before glueing. Once the hinge was fitted, the door was marked and planed to the correct size. Final adjustments were made with the door attached. A magnetic closing strip was then attached to the top right-hand corner.

The knob to operate the door was then turned on the pole lathe from a log of locally sourced ash. The log had been around the workshop for a couple of months and so not expected to distort much. The stem of the knob was adjusted to 3/4 inch diameter on the lathe and the door front hand-drilled from both sides to avoid tear-out. The knob was fixed by cutting a line across grain and using an ash wedge to secure once glued.

The final job was to fit four wheels and finish with Danish Oil to bring out the colour of the ash and offer some protection to water ingress.


Thursday, October 22, 2020

Making a wooden set-square

 A very basic tool for joinery work and easily made from a stable hardwood. I made mine from two pieces of kiln dried beech.  The stock or handle is 9 1/2 inches long by 2 1/8 inches wide and 1 inch thick. The blade or tongue is 14 inches long, 2 inches wide and 1/4 inch thick. Bob Rozaiski mentions that a good size ratio of handle to tongue is 2 : 3.

Beech set-square with a blade or tongue length of 14 inches.

The preparation of the handle and tongue took most of the time to ensure they were straight and square. The reference faces are chosen as the inside faces as they are more difficult to adjust after the square is glued. The handle was finished first including squaring and planing the end grain. The tongue was carefully planed down to 1/4 inch thickness. Next the mortice for the tongue was cut in the handle allowing the top of the tongue to rise about 1/4 inch above the blade and to protrude out of the blade for trimming later. The mortice wood was removed using a fret saw and the bottom of the mortice trimmed with a 6 mm chisel making sure that the outer edges of the bottom were above the centre, i.e the base of the mortice was concave. to make adjustment of the set-square easier. Once cut, the tongue was tried in the mortice and adjusted to get a close fit by either planing or filing the tongue. It was then firmly seated in the mortice and the 90 degree angle checked using another try-square. The adjustment was made by chiselling slithers of wood from the appropriate bottom of the mortice,

The tongue was then glued and clamped in place checking that the inside edges of the set-square were at 90 degrees. I used fast-setting polyurethane glue. The next step was to mark the position of three dowels to further attach the handle and tongue. I used 8 mm oak dowels and a 5/16 inch bit in the brace drilling from both sides. These were glued in place and then sawn and chiselled to get a smooth fit to the handle faces. The section of tongue protruding from the side was planed off and finished level to the handle.

The piece was finished by chamfering the top of the handle (1/4 x 1/8 inch) on both sides and making a curved portion at the end of the tongue. The angle on the outside of the square was checked and adjusted as necessary by plane or file. A hole was also drilled for storing the square. Finally, the wood was treated two times with boiled linseed oil.

I've made two other smaller set-squares, with about 8 inch tongues and 1 inch wide stocks and keeping the 2:3 ratio. These were made in the same way as the larger square taking care to get a tight fit of the tongue to handle.

Smaller set-square with 8 inch tongue.